Monday, November 29, 2010

Art Test

Time really flies, Snow White has attended 9 Art lessons so far. On the 9th lesson, she was asked to recall what she had learnt. Actually, I have asked her the same question for the past weeks and she said that she could not remember a thing! How sad, but is it normal for a child to forget? Snow White never revise her drawing after each lesson as I do not wish to pressurize her. I see Art as an enjoyment and cultivating her creativity at this age.

Teacher's Help
So, she could not draw. The teacher had to guide her again by first asking for her favourite drawings. Then, there were lots of promptings to get her to speak and describe about the drawings. Finally, each picture was drawn on a foolscape paper. From here, Snow White was asked to draw on her own with the teacher's samples serving as a guide. The whole process was too much for her, I have a feeling that she had actually 'swtiched off'. Her face looked so bored througout the 1.5 hours lesson.

This was what she had drawn :

A flamingo.
Can you see the teacher's outlines of the flamingo's head and neck? Snow White tried to imitate as much as possible.


An elephant


An ostrich


A drawing of a girl
Snow White got B+ or B- for her drawings shown above. There will be one more assessment on the 10th lesson. Just wondering about her performance...... 
I managed to get her to paint the following (she was bored at home), she still refused to draw, I just let her colour:


                                            It is a flamingo.


Along the way, I got my second child, Cinderella, to have some fun too:


I drew 2 leaves and a flower, she just happily ignored them and splashed her way through!


Just some thoughts.....
I really appreciate the effort made by the school to test Snow White's skills. It provides me with information about a child's development, her progress, attitudes etc. At the same time, I also hope that such test will not dampen my child's spirits. She was very enthusiastic when I enrolled her for Art lessons and she enjoyed every lesson that she attended until this one. I did not reveal the grades to her as I felt that they were not important. I hope Snow White would continue to learn and thrive in her own special way. She did not express giving up drawing and colouring, for which, I am really glad. Think I just have to encourage and praise her. After the 10th lesson, she will progress to the next stage of drawing and colouring.
I have to excite her a bit and tell her that she is capable.                                         

Sunday, November 28, 2010

Sand Art

My mother-in-law loves to bring Snow White for shopping during weekends. She would come back with food ,sweets, dresses etc. Of late, they had been doing some art related stuff. Once, they came home with this piece of Art work :

I was told that they did this piece of work on the spot, paying just a few bucks. There were pots of sand for the kids to choose from. I noticed that Sand Art was quite popular in shopping centres. Partly due to the fact that we can ask our husbands to occupy the time meaningfully with our kids while do our shopping. Of course, kids are curious. They will always want to explore and experiment with new things. Last but not least, personally, I do not need to do clean up the mess.

The work was done on a small rectangular piece of paper. According to Snow White, the whole picture was a piece of sticker. You have to peel the sticker piece by piece, apply the coloured sand on that area and then proceed to do the same for the rest of the picture. A toothpick was provided to help her to spread the sand onto the sticky area. This was her first attempt and she was very proud. As usual, she has a fondness of using dark colours for the face, she chose all the colours to use by herself.


A  few months later, my mother-in-law bought her a similar Sand Art Package. This time, I worked with her at home. I think most kids will enjoy this activity as it is not as tidious as colouring, but it does requires some skills. I noticed that Snow White was quite clumsy, she poured too much sand in one area and subsequently, there wasn't enough of that coloured sand for another area. Just remember to spread a piece of huge paper before you start pouring sand onto the sticker. This will make tidying up so much easier.  Here is her work :


The colours were just splashed out according to Snow White's liking, so she ended up with a colourful piece.
(I helped her with the facial colour. I just cannot stand her using dark colours.)

I am just thinking if it is possible for us to make our own coloured sand. Just go to the beach and collect a bag of sand. Next buy a few dyes and do the colouring ourself, spread out the sand and dry them. Anybody tries this before? The steps sound pretty reasonable, if this works out, just imagine, I think my kids will go wild and create many pictures using sand!

Wednesday, November 17, 2010

Art Is Around Us!

Paper Bag
I found a very interesting bag in my house. I believe kids will love it because it is so cute and adorable. Wonder if you agree with me. Take a look :


Isn't the bag cute? (sorry, I did not rotate the picture )


The side view. (Did not rotate picture again!)
 Of course, Snow White loved the bag and the chocolates in the bag too. I did not throw away the bag, still have it in my store room. I am thinking of creating one such bag with Snow White  much later because it involves a fair bit of cutting. The following is how I can do it:
  • Get a paper bag ready, a small one will do.
  • Next draw a picture , colour  and decorate it. Have to do double , one for each side of the bag. For a start, I think it is easier to start off with pictures on animals or food (like a big hamburger)
  • Cut out both the pictures. Paste each of them onto a hard cardboard. (We can use the backing of the drawing block etc) Then cut out the cardboard with the picture pasted on it.
  • Finally, stick the 2 cardboard pictures on each side of the bag.  Done!
Sounds pretty easy, I think this craft may be more suited for 9 years old children. I like this idea very much because we do not need to spend much money as we are using recycled bags, cardboards etc. It is ENVIRONMENTAL FRIENDLY!


Paper Boat
I also found a few crumbled paper boats in my living room !Obviously, my kids had crushed them after getting tired of playing with them for a day. My domestic helper had made them for my kids and they reminded me of my childhood. I have seen my neighbours playing and letting the boats drift down the drains. I did try making one, but it was a flat one . My helper made a standing boat! I was impressed and asked her to show me how to create. She used a page from the magazine, so the boat turned out to be colourful and when I placed it in my baby's bath tub, it did not sink. I felt so satisfied. As for my own kids, I think I will teach them at a later stage. Right now, I will make for them if they want.

I have taken pictures on how to make the boat, but some do not have the explanations, just try and imagine if you are attempting.

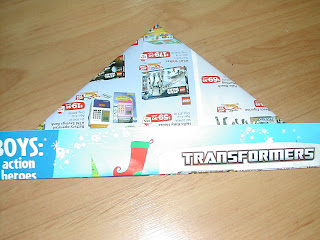
Take a page from a magazine. Fold it into half.

Bring down the 2 corners to form the triangles. Then fold up the bottom.
                                         
Flip over and fold up the bottom too. 
                                         

Open the bottom as shown.

                                                                      Flatten it.
                                          

                                          Open it up. I find this step to be the most difficult. (If anyone has a clearer    image/direction, please offer your help.)


                                         The standing boat!


This art of paper folding is known as origami. I have tried making paper balls as a child but have forgotten how to fold them now. There are websites available that teach origami, some can be really easy, but to make cute paper figures/animals---the steps are numerous and often, I find it tough to follow it.

'Glow In The Dark' Art Painting

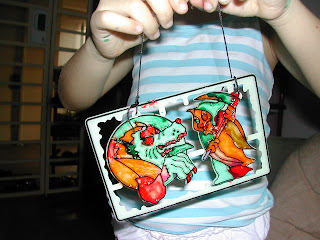
Just last week, we went to a fun fair like event held near a shopping centre in our country's shopping belt. It was to raise funds for the less fortunate children and we had a stack of coupons with us. The weather was hot but luckily, the place was sheltered. There were many games stalls, of which, my kids only took interest in  two of them. We spent almost half of our coupons on games. I had some coupons left and so went over to a few stalls that were selling 2nd hand stuff. This was what I found and it cost me only a dollar and it was brand new.(Just that it had been bought quite some time ago by the owner and the paint in the package might have dried up)

                                        It was a 'glow in the dark ' piece of painting for little kids. The only regret is that I did not buy another set for my Cinderella, so only Snow White got to do the painting and she was rather unwilling to share.

Instructions were provided behind the package. It was easy, just add a bit of water to the paint and it was ready to use. Applying the colours seemed to be more challenging. As you can see the paint brush provided(the green stick), it was very small and when painting, you have to keep dipping into the paint. You could not
add too much water or else the paint would not 'stay' on the plastic and if you added too little water, the paint became too thick., the application was not smooth. And for those small little patches, we used toothpicks to fill in the colours.

                                         Snow White applying colour. The purple colour had dried up already, so she had only 3 colours to choose from.


                                          Snow White using a toothpick to appy colours to the small patches.


                                         The completed work.


                                          Attached a string for her to hang in the room.

Should have asked Snow White to colour the border too. But she was already very happy with her effort. When the paint had dried, we waited till night time to show her the 'magic' .My 2 kids just 'Wow and wow'!

By the way, Snow White actually asked me what were those characters after the painting process. I had assumed that she could at least recognise the witch. Another learning opportunity! I gladly told her that one was a monster and the other a witch. She preferred the monster to be a dragon, or a wolf. Perhaps, I should also mention about Halloween since it was October. Just did not think of that at that time.

Crepe Paper Art

Art Work using Crepe Paper
I have been doing a bit more crafts with my kids now since the drawing aspect is taken care of by the Art School that Snow White is attending. So I am looking out for some inexpensive crafts that I can conduct with Snow White. Sometimes, when we run out of ideas, it will be good to make a trip to the bookshop. That was what I did and saw crepe paper that cost me a dollar.

Cutting and Rolling
I decided to ask Snow White to draw a huge shape on the paper. She drew a heart and said that she wanted to give it to her teacher. Next, I cut out small strips of crepe paper, about 0.5cm in width and asked her to roll into tiny balls, make sure she squeezed it tight. Thought it was rather simple, but can be difficult for a 4 year old kid. Indeed, I started off by giving her a strip of paper that was 1.5cm in width and 15cm in length . It was not successful , she could not roll and squeeze to tighten the crepe paper into a ball. When she pasted the crepe paper onto the heart shape, the crepe paper 'dangled' out. It was awful looking and so I plucked them out and decided on trying the 0.5cm width and 15cm length strip of crepe paper. This measurement was so much better. Be prepared to spend time beside your child to roll and paste.  Snow White was quite tired,  I let her take a break.

Another tendency is that Snow White would paste anywhere that she like within the heart shape. I thought this was OK till much later, I discovered that there were many gaps in the shape. Some gaps were big and others were small. I had to ask her to patch up and was not easy. You have to frequently hold up the picture to check that the gaps were covered up, then placed down and checked again. A better way is tell your child to start pasting the balls from the outside , then move towards the centre of the heart or vice versa. In such a manner, work will turn out to be tidier.


This activity looked pretty easy, just need some planning. I also enagaged my second child, Cinderella, to do it too. She's two and a half years old and would just roll without squeezing the paper into a ball. She had fun though she did not complete hers and there were many more gaps in her picture.

                                         The heart shape that Snow White drew before pasting.


                                         I tried cutting the strips into different widths and lengths.


                                         My 2 kids completing their Art.


                                         Cinderella squeezing the glue on the paper. She enjoyed this step very much. Can you see that she did not roll her paper properly into a ball? (She did try, I think this is more important than seeking perfection)

                                    
                                          Cinderella's completed work. (I drew the star for her.)


                                    Snow White's heart. Glad at last, I can see the heart though there are some gaps still.